Local Multiplayer Mod
LocalMultiplayer is a mod for YAPYAP that makes local multiplayer possible using just a single Steam account.
FEATURES
- Run multiple YAPYAP instances simultaneously on one PC
- Connect all instances to the same multiplayer session
- Works with a single Steam account
- Uses Photon Voice for networking
- No payment required to use Photon Cloud
- Global configuration file shared across all mod profiles
What You’ll Need Before Starting
To use LocalMultiplayer, you must create your own Photon Cloud application. This is mandatory but completely free. The mod does not include a default Photon App ID, so each user must supply their own.
Step 1: Create a Photon Voice Application
- Visit the Photon Engine website and sign in (or create a new account).
- Open the Dashboard.
- Create a new Photon Cloud application.
- When prompted to choose an SDK, select Voice.
- Give the app any name you like and finish the setup.
- Copy the generated Voice App ID.
Step 2: Configure the Mod
The mod generates its configuration automatically the first time you launch the game with it installed.
- Download the LocalMultiplayer mod (scroll below).
- Unzip it to BepInEx\plugins. Here’s more info on how to install mods for YAPYAP. If you don’t have BepInEx, download it here.
- Start YAPYAP once with the mod enabled, then close the game.
- Locate the global configuration file at:
%userprofile%\AppData\LocalLow\maisonbap\YAPYAP\LocalMultiplayer\AppIdVoice.txt - Open the file and set the Voice App ID to match Photon Voice by pasting it.
- Save the file.
This global setup ensures your Photon App ID isn’t tied to individual mod profiles or shared accidentally through profile exports.
Step 3: Set Steam Launch Options
- Open Steam and right-click YAPYAP.
- Select Properties.
- In the General tab, find the Launch Options field. Paste the following line:
–doorstop-enable true –doorstop-target “YOUR_PROFILE_LOCATION_HERE\BepInEx\core\BepInEx.Preloader.dll” - Make sure the file path points exactly to your profile’s BepInEx\core\BepInEx.Preloader.dll file.
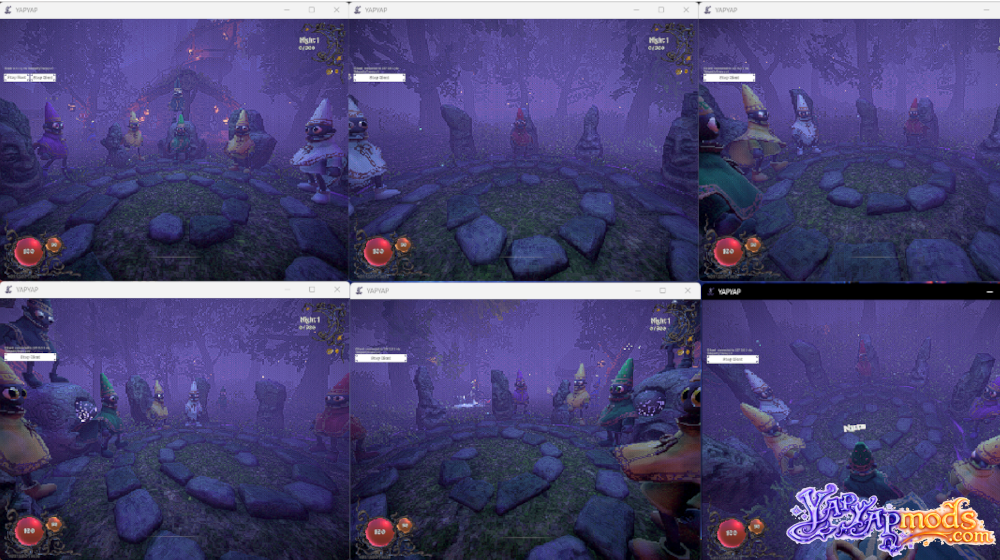
Step 4: Testing Local Multiplayer
Once everything is set up, you can start testing.
- Launch YAPYAP.
- Go to Options → Display.
- Set Screen Mode to Windowed for easier switching between instances.
- Click Play and select any save slot if prompted.
- On the loading screen, a new panel will appear with:
- Username field
- IP address
- Port
- Buttons for Host, Server, and Client
For your first instance:
- Click Host without changing any settings.
Next:
- Launch YAPYAP again (you should now have two instances running).
- Click Play on the second instance.
- On the loading screen, choose Client to join the hosted session.
If everything is configured correctly, both instances will connect to the same multiplayer game.
Made by: darmuh